
Building a gaming computer is no easy task. It takes a lot of thought and preparation to pick best parts and design a new gaming build. Thankfully, there are plenty of hardware options to go with currently, and a lot of information can be found online about best parts to pick for your upcoming gaming build or otherwise. Since I’ve built a new gaming machine quite recently I’ve decided to offer a list of components (including some of the ones I use) that are great for constructing a new gaming build and after using my current setup for almost half a year, all of these have proven to be very reliable. Here are some of the parts to pick for a mid-range gaming PC that won’t disappoint with its performance. For most choices in parts, I try to offer at least 2 different options that cover budget products and moderately priced components.
CPU – Intel Core i5-6500/6600K

Now, there are plenty of options available when picking up a gaming processor, and they usually range along the higher end of the price spectrum. However, one doesn’t have to spend a lot to get a generally good processor that works for heavy gaming and multi-tasking, and Intel’s i5 is a great offering all-in-all.
Although Intel’s Core i5-6600K is considered to be the best i5 available on the market, with its ability to overclock beyond stock speeds, an i5-6500 also offers a great gaming solution. I mention both processors because I’ve been using an i5-6500 with my gaming build, where it works really great, and because the price difference between two options sits around $50-70. It’s something to keep in mind for really budget-oriented gamers, and in many cases, an i5-6500 offers a better bargain.
Core i5-6500 is a quad-core processor, locked in at 3.2 GHz and with 6M Cache. In most gaming tasks, this clock speed is quite enough and I’ve had no issues with the CPU bottlenecking my graphics card. With software work, this CPU is not bad either, and multi-tasking generally offers a smooth experience in Windows 10, although I haven’t run many of the demanding tasks people would use apart from gaming. Core i5-6500 also supports a variety of gaming and regular motherboards from the H110 to the Z170 chipset, but as usual, the Skylake platform will benefit the most from a Z170 motherboard. The processor comes additionally equipped with an integrated Intel HD Graphics 530, but don’t expect it to run much if you’re going for a gaming build – a dedicated graphics card will be a must.
Now on to the i5-6600K, and for those not concerned about the price, this processor offers a much better gaming option. A big plus is that it’s an unlocked processor and allows for easy overclocking, provided you have a great cooling solution to keep it under control. The base clock also starts at 3.5GHz, at 0.3 higher than the i5-6500’s stock and the 6600K can be overclocked to a plentiful 4.0GHz. It comes with the same integrated graphics chip as the lower option, and besides support for a few additional chipsets (such as Q150 and Q170, which I haven’t seen to be all that common), there is few differences between it and the 6500. However, the capacity for overclocking makes it a worthwhile upgrade, especially where the 6600K climbs up close to a faster i7 processor.
Both of these processors are really great for gaming, and it’s highly likely your budget will determine the choice between the two. The i5-6600K is better overall and allows for overclocking to 4.0GHz, making it a lot faster than the 6500 for gaming tasks. But still, I’ve never seen an i5-6500 bottleneck any other parts of my gaming build, and its support for fast ram still allows it to be a great choice when picking a gaming processor.
CPU Cooler – Cooler Master Hyper 212 Evo/Hyper T2

Air-cooling solutions still remain a very competent option for gaming builds, and for the sake of keeping the price lower I can’t include a liquid cooler, as most options cost at least $100 for CPU cooling. CoolerMaster offers 2 great processor coolers, one that’s widely known to offer high levels of performance, the 212 Evo, and one that I’ve been using with my i5-6500 instead of the weak stock cooler (please don’t ask why I was stupid and didn’t just grab the i5-6600K).
Hyper 212 Evo is the best overall air cooler, and offers best performance for the price out of all standard CPU cooling solutions. However, there is only one problem with it – the large size can make clearance difficult for some cases, and you might wanna go with the T2 for Mini-ITX build. In my Corsair Carbide Spec-Alpha ATX Case I wasn’t particularly certain it could fit the chunk of mass that the Hyper 212 Evo, and with good airflow positioning, I was able to use the T2, and it doesn’t work so bad at all. But back to the Hyper 212. The cooler comes equipped with 4 direct-contact heat pipes and a tall layer worth of its heatsink tied to a 120mm cooling fan. The Hyper 212’s heatsink does a great job at redistributing heat away from the processor, but is also the cause of its massive size. However, if you take the time to learn dimensions of all components and know the Hyper 212 Evo clears for sure, then that is definitely the option to get for gaming builds.
Now, if the size of Hyper 212 is too much, the next best solution to get is Cooler Master’s T2, which is a much smaller cooler. But why would you go with a custom cooler on a locked i5 processor? you would ask. For the purposes of better air flow, i chose to go with the T2, as unlike the stock i5 cooler, I could position it facing the back fan of the case. It is recommended to face a processor cooler towards the back, whereas a stock Intel cooler pumps out the hot air inside the case. With a locked i5-6500, I’ve seen great performance out of the T2 cooler, and it never took my CPU above 60°C in demanding gaming tasks. Cooler Master Hyper T2 comes with only 2 direct contact heat pipes and a smaller heatsink than its 212 Evo counterpart, therefore it is not best to use if you go with a Core i5-6600K. However, the T2 holds up very well in cooling off locked Intel processors, and if you desire to avoid loud noise from your PC as the fans struggle to pump out all hot air, it is one of the best options to go for in a smaller-form gaming build.
Graphics Card – GeForce GTX 1070

Nvidia’s GTX 1070 released last year has proved time and again to be a favourite for many PC builders, and currently holds the title as the best budget graphics card available on the market. Since availability has stabilized, the GTX 1070 is now moderately priced, and offers groundbreaking performance at a $400 price tag. It’s also offered in multiple size options, from a small Mini-ITX form factor (at the moment it seems the only single-fan model currently available is offered by Gigabyte) to the extreme models with triple-fan setup by Gigabyte or Asus.
I personally own a Gigabyte G1 Gaming GTX 1070 card (for information, my review can be found here), and it delivers really great performance with its Pascal architecture and 8GB GDDR5 video memory. It is not the fastest card currently available, but it holds title as one of them and for the price, its really hard to beat. Gigabyte offers one of the better deals for a GTX1070, however all other 3rd-party manufacturers offer great variants of the card, so in this case, the choice depends a lot on personal preference. Options from EVGA, Asus, MSI all perform really well and people haven’t discussed many issues with offerings from any brand.
I was very impressed with the graphics card’s performance, and the GTX1070 literally rips games apart. There isn’t particularly anything available on the market to seriously challenge it either and most games will run at full resolution and smooth 60 fps or higher. I have been able to maxx out most of my games, and aside from heavy taxing advanced graphics options in Grand Theft Auto V, there isn’t any game that seriously challenged my setup. Even paired with an i5-6500, there is absolutely no bottlenecking on the GPU, and even if the 1070 might not perform at the max 100% power, it still works incredibly. With that said, keep in mind I’m using a 1080p monitor, so those with higher end options for a screen may experience some slowdowns, but nonetheless, it is the best GPU choice for a gaming build regardless of the budget, unless you know you can cash out on a GTX 1080.
Motherboard – MSI H110M Gaming mATX/Gigabyte Z170-X Gaming 6 ATX

With motherboards, Intel’s LGA1151 socket offers a plentitude of options, ranging from budget boards under $100 to high-end offers such as Asus ROG Z170 Maximus VIII Hero Alpha. I will be using my current motherboard as an example, again, on the basis of reliability I’ve seen out of my build, but with that said, there are plentiful of options to look out for and another option I’ll include is the MSI H110M Gaming
On the lower end of the price spectrum, many brands offer motherboards based on the H110/H170 chipset, and those looking for a budget gaming build won’t be disappointed with any cheap options (just make sure to avoid ASRock as their lower-end motherboards aren’t known as particularly good). If you aren’t really concerned with RAM speed (and the lowest DDR4 clocks still run great in gaming tasks), then H110 is very affordable and doesn’t lack the important components. However, as it is the entry level gaming chip, H110 has a lot of limitations when constructing a gaming build.
The MSI H110M Gaming supports any of Intel’s processors, including the Skylake i7 and can take 32GB of DDR4 RAM (albeit it won’t take memory clocks over 2133 MHz). The motherboard still offers plenty of connectors, including USB 3.1 at the back, however it noticeably lacks any M.2 slots, which in all fairness, you wouldn’t expect on a board like this. The MSI H110M offers up to 4 SATA interfaces, which is still more than enough for storage options and will easily fit a single hard-drive and an SSD. It wouldn’t be particularly best at fitting more than 2 storage options since the board is a mini-ITX form factor, and likely, with this build you’d go for a small-factor PC. The H110M by MSI is a great choice for a Skylake motherboard, and although it significantly lacks in features and offers minimum required, it still holds up really well in gaming tasks, especially paired with a powerful graphics card.

The Gigabyte Z170-X Gaming 6 might not be at the top of the Z170 range, but it offers a lot of great features at its price tag and one of the best user experiences as well. This motherboard has proven to be very reliable, and I would recommend it as the best choice among Gigabyte products. It is not the cheapest option, but its features make it worthwhile. Gigabyte Z170-X Gaming 6 motherboard offers an ATX form factor, which avoids it comparison with the H110 chipset, and frankly, these two motherboards are almost at separate ends of the hardware spectrum for Skylake boards. As a result, it offers a considerable addition in terms of features and supports increasingly more devices to add inside a gaming build.
For a start, the Z170-X Gaming 6 allows for a lot of headroom when picking system RAM, and supports most available options capping out at 3700 MHz. My G.Skill TridentZ 16GB 3200MHz sticks work perfectly in a build with this motherboard and if you have a budget for RAM, I would recommend going with at least 2400MHz on the memory speed with this motherboard (anything above 3000MHz will benefit most but also adds a bit on the price). Additionally, the ATX form factor supports SLI/Crossfire, allowing to fit another graphics card if the need for upgrade arises. Along with 6 SATA slots and 2 M.2 interfaces, the motherboard provides plenty of opportunities for future build expansion.
Gigabyte’s Z170-X Gaming 6 offers a very clean BIOS interface, which is unfortunately not commonly found among many brands. The menus are easy to navigate, and most tasks can be easily accessed from the main BIOS screen. Gigabyte offers one of the more sleek user interfaces in their BIOS options, and the Gaming 6 has also been praised for its stability by some news outlets. If you have the budget room to go for a Z170 motherboard, Gigabyte additionally offers other options to fit different budgets, as do other brands like Asus and MSI. The Z170 platform offers to get the most out of a 6th generation Intel processor, and ATX form factor boards will offer a lot of room for future improvements.
RAM – 16GB G.Skill Ripjaws V-2133MHz DDR4/16GB G.Skill TridentZ 3200MHz DDR4

Choosing system memory is very important, and although you could still currently do with 8GB of RAM, the increasing demands of big name releases make it wise to invest into a 16GB memory kit. DDR3 RAM kits are no longer a viable option, and Intel’s Skylake platform comprising builds of the past few years already demands DDR4 memory. As always, there are plenty of kits to choose from among G.Skill, HyperX and Corsair.
G.Skill usually remains at the more affordable end of the memory market, and its higher performance model line offers faster speeds, which is why I’ve included two options from the brand as great picks for a gaming build. G.Skill Ripjaws V start as the lowest DDR4 memory clock options and offer budget kits for those interested in just gaming. Even still, I would recommend picking up a 2400MHz memory kit as a bare minimum, however if you plan on using one of the lower-end motherboards such as H110, restriction on the clock speeds will play a major deciding factor. DDR4 memory performs really well at any speeds, and if 2133 MHz is not avoidable, it still wouldn’t largely disappoint. A significant portion of games rely mostly on memory capacity and not its overall performance, so picking up a 16GB memory kit is a necessity for some current and upcoming future games. G.Skill Ripjaws V are known to be reliable when it comes to RAM kits, and the product’s low profile design offers plenty of clearance in tight mini-ITX builds.
But say you went with a full-size ATX motherboard, and want at least 3000 MHz clock on your memory kit, then G.Skill TridentZ is the best option to go with, as they are still priced moderately relative to high-end RAM kits. I’ve used a 2x8GB DDR4 G.Skill TridentZ 3200 MHz memory kit, which contributed to overall fast performance on my gaming machine. Considering this RAM will require an ATX motherboard to support its clock speeds, clearance with a CPU cooler will not be an issue, and G.Skill has just recently updated the model line-up with RGB lights. However, even though I include two options from G.Skill in the RAM category, other brands like Hyper X and Corsair are known to perform really well in gaming setups. Thus, your RAM choice will highly depend on your gaming budget, however G.Skill often has better price to performance ratio.
Storage – 3TB Toshiba SATA 7200rpm Mechanical Hard Drive/275 GB Crucial MX 300 SSD

In a gaming PC, storage is just as important as all other components in the build, and going for higher capacities is usually the best option. If you’re like me and have 200 games, a beefy hard drive is a necessity. However, an SSD is also an important part, as it allows for faster loading times and a much faster system boot than a hard-drive would. As a result, I would always recommend grabbing both disks for a gaming system build. An SSD will greatly benefit with system loading times and general multi-tasking performance, however it doesn’t really benefit with loading times in a lot of games.
Aside from a few titles, my hard-drive never proved to be slow in running most of my games, and the few seconds difference with the SSD is not enough to warrant taking up space on the system drive. With the size of modern games, which often take up 40-60GB for an install, hard-drives still remain the best storage option, however I would definitely recommend picking speeds of 7200rpm as a basis. A 5400rpm drive will be considerably slower, resulting in longer loading times, and most of us don’t want to wait around for a game to load (we already have consoles for that).
A hard-drive can be very hard to pick, and although there is a vast range of options available on the market, only WD and Toshiba are generally the most reliable options to go for. Seagate drives are known to be faulty and an unreliable drive is far from ideal in a gaming build. I’ve been using a 3TB Toshiba 7200 rpm drive for over 3 years, and it still performs per my expectations, despite the many times I’ve filled it up and wiped it. It’s proven to be a reliable hard drive, and its the one I often recommend using, however Western Digital’s many options perform really well too. For optimal storage size on your PC, I would recommend going for at least 2 TB, as anything below won’t fit many of your modern triple-A games, but the 3TB model is the best choice if you want a lot of storage.
When it comes to SSDs, there is a bigger division between the budget and high-end models. Despite many M.2 & PCI-e high-performance drives currently available, traditional SATA SSD can still deliver great performance, and even they load Windows 10 within 10 seconds at most. Crucial currently offers best budget SSDs on the market, and although the company hasn’t always made best decisions when it comes with fitting their models, it still remains one of the better offers. I’ve personally went with a Crucial BX200 480GB SSD, and I’m fairly pleased with performance despite many saying it was one of the slower drives on the market. So far, I’ve experienced no issues and the SSD proved to be reliable, however Crucial’s newer offering, the MX300, makes for a better storage solution.
The base model is only available starting at 275GB capacity, but that is also plentiful storage for all your system needs and even some video games. It is always best to have a good amount of free space on an SSD, as taxing it up with storage will often result in slower performance, and 275GB offers plenty of space for some of your games. Personally, I haven’t seen the benefit of an SSD to gaming, and except strategy games (Ashes of the Singularity, XCOM, Civilization), most titles don’t need the speed of an SSD to offer decent loading times. Most apparent benefits from getting an SSD include quick multi-tasking and quick OS loading times, which make the drive already worthwhile
Power Supply – EVGA SuperNova G2 550W Fully Modular Power Supply

EVGA is known to produce excellent power supplies besides other types of products, and the SuperNova G2 is no exception. Its price point is not exactly oriented at cutting down overall costs, but you never want to skip out on a high quality power supply. For a build around an i5 Skylake and a GTX10-series card, the range of 450-550W works perfectly to power all components, and there is hardly any point in going above unless you know you will definitely be expanding your build later.
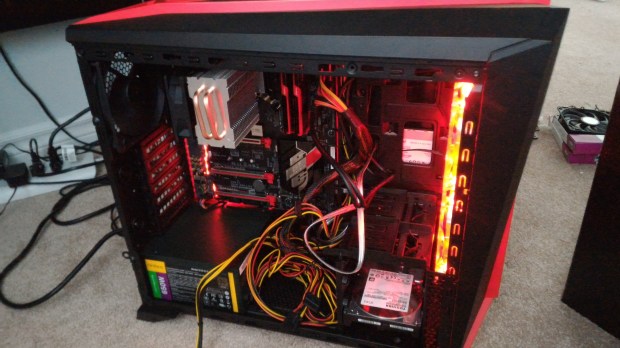
EVGA SuperNova G2 is a fully modular 550W gold-certified power supply, which makes it ideal for any type of builds. Compact systems always benefit from the use of a modular power supply, as lack of extra wires keeps the build very clean. Even an ATX tower can certainly improve from no mess that’s usually created by external wires (evident by my slightly poor cable work in the very first photo). EVGA’s power supply comes with a 7 year product warranty and additionally features an Eco mode for reducing power consumption. The SuperNova G2 provides excellent performance to last, and although there are many other good options by well-known brands, you’ll be hard pressed to find a gold-rated fully modular supply at $100 from anywhere else.
Case – Cougar QBX Mini-ITX Tower/NZXT Phantom 410 ATX Tower

I’ve included 2 different cases in this list to show distinct parts between ATX form factor and mini-ITX builds, which also places many of these components into differently priced categories. However, pricing is not always the main deciding factor, and some people would simply enjoy the convenience offered by a small factor form build. Others won’t be bothered so much, and an ATX system generally doesn’t take a lot of space under the desk either. With either option, one comes away from with a clean gaming build, as long as all options are configured prior to purchase.
The Cougar QBX Mini-ITX is a really sleek compact case, that offers the space to fit a full ATX power supply provided it has a modular design. QBX offers one of the best small-form case models, which at the same time is designed in a way to get the most out of its small size. This case can easily fit a full-length graphics card to make it a powerful gaming platform, and if you’re using 2.5″ drives only, you can fit up to 4 in it. However, from standard 3.5″ bays only one is present. The Cougar QBX is also moderately priced, although not the cheapest among Mini-ITX towers. But if you’re willing to invest, the Cougar QBX will make one of the cleanest small PC builds, and one that also offers some impressive space capacities.
Although I’d be tempted to include the Corsair Spec-Alpha case on this list, I am going to really avoid it for bias purposes. The SpecAlpha is one of the best ATX towers available, but it’s also given me a lot of troubles when setting up my build (including when I almost broke a part of it). Another strong contender on the market is NZXT’s Phantom 410, which is a feature-packed ATX tower with an affordable price tag. The Phantom 410 is a sleek looking case with aggressive design elements, and comes packing space for plenty of storage drives among other things. Of course, components clearance wouldn’t present a problem in an ATX tower, so you could deck it out as much as physically possible, however for the purposes of this list lets assume its a sub-$1000 gaming build.

The case comes with 3 120mm air fans pre-installed, like many case options offer nowadays, and those are enough to provide all your cooling needs. 6 3.5″ storage bays allow for plenty of future storage expansion, or the cage can be removed for a liquid cooler radiator. In either case, a typical gaming build will mostly occupy half of what the Phantom 410 offers, but its still a great case for starters. There’s additionally 3 external 5.25″ drive bays if you wish to use a Blu-ray or DVD drive. The Phantom 410 is built around a tool-less design, which allows easy access to most of its sections and side panels can easily be removed with no screws in place. The case’s frontal ports are a standard set of 2 USB 3.0 outs, audio for headphones and mic and additional 2 USB 2.0 ports. USB connectivity from the front has always been a problem in many cases, forcing me to use a USB Hub, so its nice to see NZXT offer a more feature-packed case. The Phantom 410 makes for one of the best ATX gaming cases available on the market, and while there are many alternatives to consider, this provides for a cleaner build than the rest of the competition. And its one of the best-looking cases too.
